- Â
B Reference
B More on NURBS
If you’re curious to learn more about NURBS and continuity control, I’m sharing a couple of links that go more in depth on how this geometry works.
These series of articles are intended for Alias users, and although some tools and terminology is different, the theory is the same for Rhino. I would start with the “theory builder”:
http://www.aliasworkbench.com/theoryBuilders/
The section on “Golden Rules” is good too. We don’t necessarily follow all of them because some of them are specific to the needs of car body design and others are more finicky that are necessary at our skill level:
http://www.aliasworkbench.com/goldenRules/
See the rest of this site here:
http://www.aliasworkbench.com/
This article links to a somewhat comprehensive definition of NURBS
http://www.rhino3d.com/nurbs
The Wikipedia page for NURBS is also a useful reference:
https://en.wikipedia.org/wiki/Non-uniform_rational_B-spline
This has a relatively easy to follow, but very thorough discussion of the important terms:
http://www.pilot3d.com/NurbSecrets.htm
This article links to two other that are more deep in their description, with equations and formulas that are quite complex:
http://www.mactech.com/articles/develop/issue_25/schneider.html
http://web.cs.wpi.edu/~matt/courses/cs563/talks/nurbs.html
B Super Normal
I will try to add the exhibition catalog to a course reserve in the library. Below are some slides I have put together.
B A Spoon a Day
Finnish designer Stian Korntved Ruud did a project where he made (and designed) a different wooden spoon every single day for a year. I think this is an interesting project to consider in light of our current cutlery design project because working within the category of spoon you can see some designs that are fairly conventional and familiar, but also others that are definitely outliers for what’s acceptable for the category. And if you can imagine having to come up with a new design for a spoon everyday, you would be forced to really understand the boundaries of the category. See more about the project (including an image of every spoon – I think) from the designer’s website here:
http://www.stiankorntvedruud.com/Daily-Spoon-2014-15-1


B Intro to CNC / Surface Toolpaths
I’m sharing the slides we looked at in class this past week. Enjoy!
B Surface-Driven Toolpaths: 2 sided Machining
This series of videos shows how to set-up a file in Rhino for export to MasterCAM, roughing and finishing operations, and “flipping” the part in MasterCAM to cut the second side.
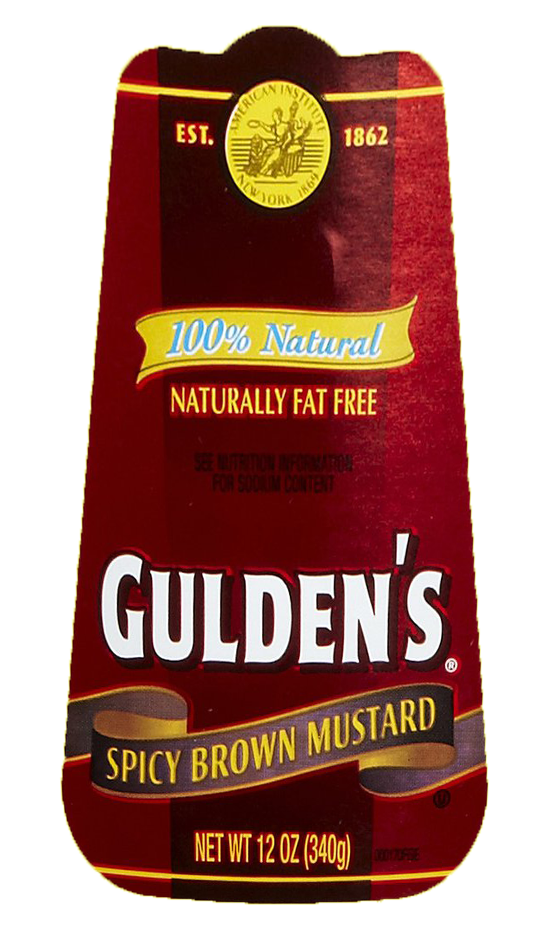
B Mustard Bottle Tutorial
If you need a refresher of the surfacing commands we have covered (sweep 1& 2, loft, networksrf), you can download the PDF file below. This tutorial will cover the steps to build the mustard bottle shown below. You can also use the images below as textures to create a realistic rendering of this object.
http://cad2017.christopherspecce.com/wp-content/uploads/2017/10/MustardBottleTutorial.pdf

B Building a Star in Grasshopper
Here are the Grasshopper definitions I showed last week, with several variations on how to draw a star.
http://cad2017.christopherspecce.com/wp-content/uploads/2017/10/StarBuilder.zip
B More Resources for learning Grasshopper
As I mentioned in class, the Grasshopper Primer is a great text to start with.
http://grasshopperprimer.com
Another great series is “Grasshopper Getting Started”, which are hosted by David Rutton, who is the creator of Grasshopper. It is from a few years back, but still a good thorough introduction.
https://vimeopro.com/rhino/grasshopper-getting-started-by-david-rutten
Lynda.com also has a 4 hour grasshopper course that looks pretty thorough. All RISD students have free acess to Lynda.com, you just need to register for an account while you are on the campus network. After that, you can access it anywhere. See more here about accessing your Lynda account.
https://www.lynda.com/Grasshopper-tutorials/Up-Running-Grasshopper/174491-2.html
See more options here:
http://www.grasshopper3d.com/page/tutorials-1
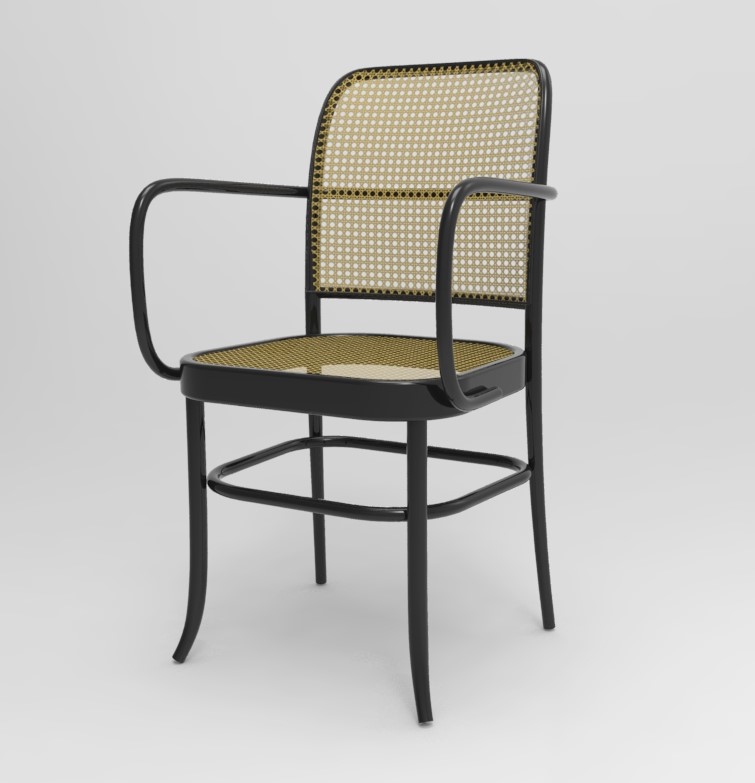
B “History” functionality in Rhino
We didn’t look at this in class, but the “History” functionality in Rhino could be very useful as you are work on building the bentwood chair. This functionality will link input and output geometry. In other words, it can connect a curve (input geometry) with a pipe (output geometry) so that if the input curve is manipulated, the resulting output surface will follow this change.
More information here:
http://docs.mcneel.com/rhino/5/help/en-us/commands/history.htm
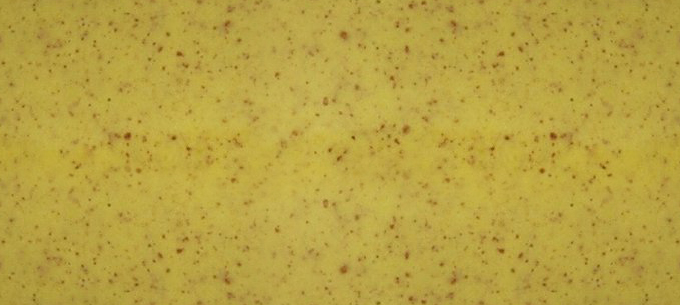
B Chair Cane and Wood Texture
Here are two images that can be used to simulate a caned surface.

![]()
A basic review of how to do this in Keyshot:
- Assign the objects you want to have this texture with a “Matte Paint” material with any color (other materials will work as well, but this is a good start)
- Find this material in the list of in-use materials from the materials inspector, double click on it
- Click on the “Textures” Tab
- Assign the black and tan image to the “Color” texture option
- Assign the black and white image to the “Opacity” texture option
- Make sure the option for “sync” is turned on from the bottom of the textures properties
- Adjust the scale as needed with the slider or by entering a number in the field associated with the scale slider
And here is a wood texture you can use (it’s bigger when you download it).
![]()
B Navigating the view of your workspace
By now I am hopeful that you all understand the basics of navigating the view of your model with the various functions we discussed in class.
Zoom (remember, zooming focuses on the cursor position)
- CTRL (windows) or Command (mac) + hold right click and drag forward (in) and backward (out)
- scroll wheel up and down
- pinch on trackpad (mac). You should use a mouse though.
Pan
- shift + hold right click and drag
- two finger drag on trackpad. Again, use a mouse.
Rotate (aka tumble, orbit)
- hold right click and drag
- two finger hold click and drag on trackpad. But of course, you will be using a mouse
Sometimes when you are viewing your model, you can get lost. This can happen if you zoom in or out to far or your rotate away from your object. When this happens, you can Zoom the “Extents” of your workspace. This means that the “camera” will reposition to display all of the objects contained in your workspace. To do this you can:
- click on the “ZoomExtents” button from the toolbar (looks like a magnifying glass surrounded by four triangles
- from the drop down menu select View>Zoom>Zoom Extents
- Type the command Zoom”, then pick the option “Extents”
Another thing that sometimes happen is you either can’t zoom in, or out any further than you are, or when you rotate the view, your object doesn’t stay centered in the viewport. This happens when the “focus” of the “camera” is not where you want it to be. A useful command to remedy this is Zoom Target. This allows you to select a point to recenter the focus of the camera. To do this you can:
- click on the “Zoom Target” button from the toolbar (it is the right click function of the “Zoom” button, which looks like a magnifying glass that is partially over a square drawn with dotted lines
- from the drop down menu select View>Zoom>Zoom Target
- type the command “Zoom”, then pick the option “Target”
Once the command is running you will be prompted to select a new target. Click where you want your target to be placed, then you can draw a rectangle to establish the extents of the view.
B A review of Rhino’s interface and Geometry Types
If you need a refresher, here is a review of the Rhino interface.
And here is a review of the various kinds of geometry you can work with in Rhino.
B How to make a screenshot
The drinking glass assignment requires that you take a screen shot of your revolve curves. Here’s how to do this:
Windows and mac:
Make sure the viewport you want to capture is active, then run the command – ViewCaptureToFile.
Also FYI:
the Mac OS has an easy to use screen capture tool built in. Press Shift+Command+4 and a cursor will appear that allows you drag an area to capture as a screen shot. You should hear a shutter sound, this means that the image is saved to your desktop.
Windows has a built in app called “Snipping Tool” that can be used for screen shots.
B More information on the “PictureFrame” command
If you’ve seen Part 1 of the Drinking Glasses Demo videos, then you’ve gotten a taste of what the PictureFrame command can do. This is a great tool and I use it all of the time if I need to bring in an image to use as an underlay for tracing, modeling, reverse engineering, etc, etc. Here is a more in-depth look at how it works.
-
Classroom
-

Leave a Reply
You must be logged in to post a comment.