- Â
í Assignments
í Week 8 Challenge: Red Things
Advanced: Build the “scoop” object shown below. It does not need to be a solid, and you only need to build one; three are shown to indicate the form. This Rhino file has some of the curves that can be used to build this object.

Top and Front Orthographic Views:

Potential Application:

Beginner: Working from the provided Rhino file, build the form shown below (do not use the patch tool!)
Orthographic Views:

í Week 7 Challenge: Spoons
Beginner: Build a model of the metal spoon that has been distributed in class. Orthographic top and side view images of the spoon are provided for your convenience below.


Advanced: Build the common disposable plastic spoon depicted below. This object will be distributed in class for you to inspect. This Rhino file provides some of the curves you can use to build this object. Begin by building just the “top” surface of the spoon (as shown below) – don’t worry about giving it thickness or making it a solid. If you succeed with that, try to complete the “bottom” and other surfaces necessary to form a solid.

í Week 4 Challenge: Canoe (Advanced)

Build a model of the canoe as shown above. The Rhino file linked below includes some useful geometry for building this object.
http://cad2017.christopherspecce.com/wp-content/uploads/2017/10/CanoeExercise.zip
í Week 4 Challenge: Toy Boat (Beginner)
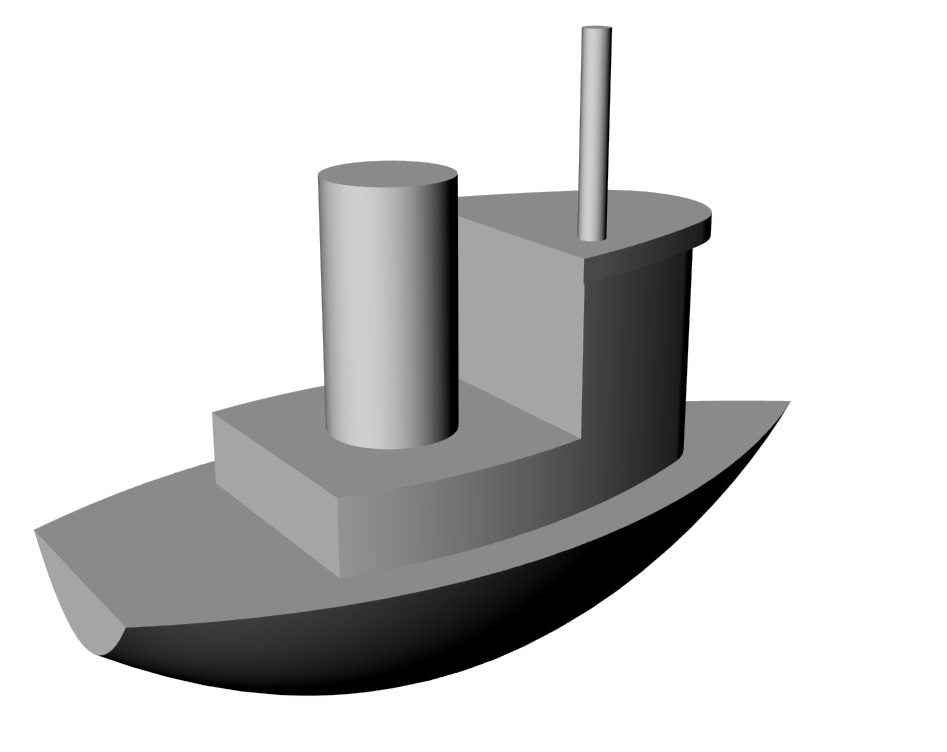 Build a model of the toy boat indicated in the orthographic views below (click on each image for the full size, uncropped file).


í Week 3 Challenge
Write a detailed set of instructions describing how to draw a 5 pointed star. If this proves too difficult, do the same for a triangle.
í Week 2 Assignment: Advanced
Part 1: Revise and refine the design, model, and rendering of your cream and sugar set.
Part2: Working from the Watering Can Project Brief, begin exploring design concepts for your watering can with freehand sketching. This initial exploration should result in three distinct design concepts, represented in clear, descriptive, and communicative concept sketches. Work in a manner that demonstrates a commitment to creating sketches that can engage with a broad audience.
The design of the watering can should address the unique functional and aesthetic concerns of this object. Some considerations:
- Ergonomics: How does your design impact the usability of the object and the comfort of the user?
- Purpose: What kinds of plants could your watering can be used on? How does this impact the utilitarian and aesthetic aspects of your design?
- Context: What situations will this watering can be used in? How does it’s environment affect the design decisions you will make?
- Technology: How do the capabilities of your materials and production processes impact your design?
At the start, designs should be developed with traditional sketching methods, by hand, on paper. This is essential to articulate concepts and to facilitate discussion and technical support in building the model in Rhino. These sketches are required and should show an investment in time and effort. The three designs should also be developed into a “wire-frame” model in Rhino that describes the form, scale, and proportions of the object through a series of three-dimensional curves. Some basic surfacing is also permissible, but the idea is to focus on the scale and proportions, implying form and surface with curves.
í Week 2 Assignment: Beginner
Part 1: Revise and refine your work from the glasses project as necessary
Part 2: Working from the brief for the Chair Study project, create the following:
Rhino File
- Build a model of the chair.
- Begin by drawing 3D curves that faithfully capture the proportions and scale of the chairs.
- Most of the bentwood components should be built with the pipe tool, with the majority of remaining surfaces built as extrusions or surfaces from planar curves (“planarsrf” command).
- Use nesting layers to place each part of the chair on a separate layer
- Build your model with a considered, deliberate relationship with the origin
- Keep all important curves on layers to facilitate organization and management
Rendering
- Using Keyshot, create a single rendering of the chair composed and arranged into a photographic scene in order to create an interesting image.
- Save your rendering in JPG format.
Create a folder in the shared Google Drive’s Chair Study folder with your name and place your rendering in this folder
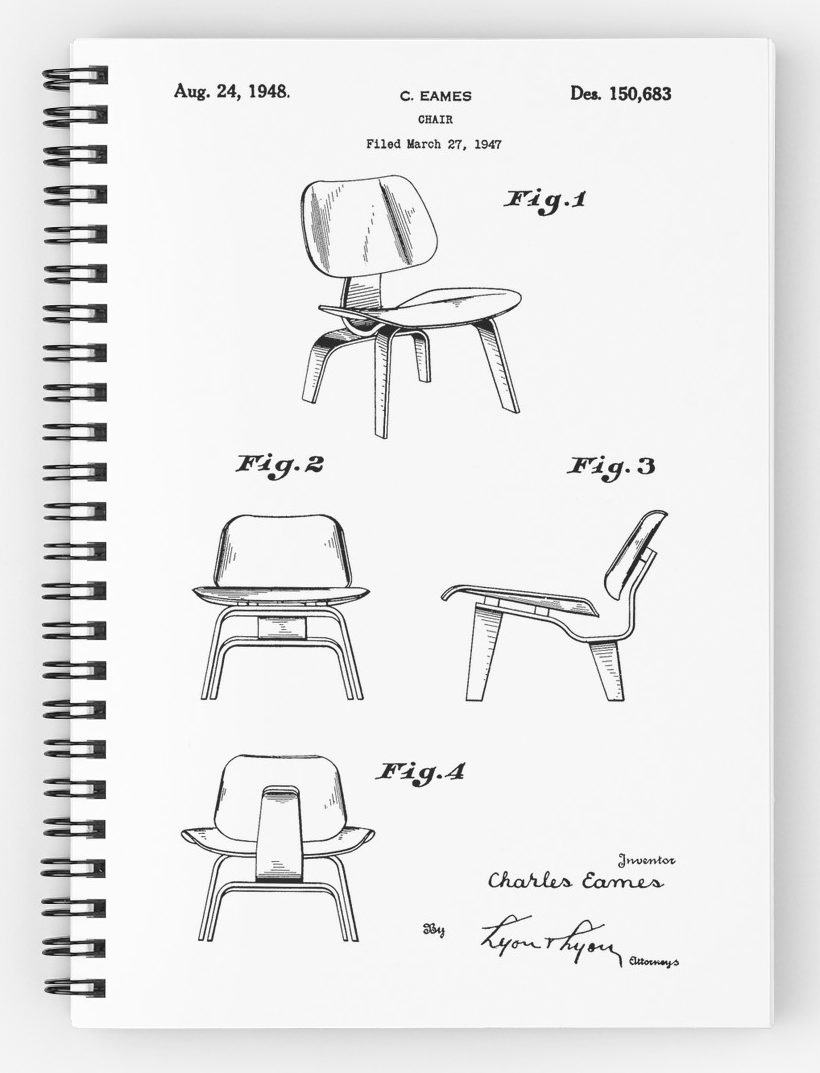
í Week 2 Challenge: Advanced
Build a model of the Eames LCW, as shown in the photos below.

í Week 2 Challenge: Beginner
Part 1: Tracing
Use the image below to trace the figures shown in red. Each figure indicates the drawing tool you should use and two of them have specific instructions about the number of points your drawing should have.

Part 2: Drawing in 3D
Fit a control point curve in the tubes included in this model. Use the exact number of points indicated by the layer name.

Part 3: Lego Figure
Using this Rhino File, assemble the Lego figure in the poses indicated this document.
Keep the original model, and make a new layer (or set of layers) for each pose.

í Assignment 1
Advanced: Cream and Sugar Set
due: 9/19/2017
Design and model a cream and sugar set for a coffee service.
- The creamer should have a spout and a handle
- The sugar dish should have a lid with a handle
- They can be intended for production in any material(s)
Use freehand sketching to develop the initial concept and form of your design. Sketch on 8.5” x 11” sheets of paper. Scan or take legible photographs of the sketch(es) that guided your modeling. Use Photoshop to clean up this image if necessary.
Model your design in Rhino. Use layers to organize your file, preserving important construction and reference geometry.
Create a rendering of your design with Keyshot.
Upload your sketches, Rhino file, and Keyshot rendering to the shared Google Drive.
Beginner: Drinking Glasses
due: 9/19/2017
Design and model a family of 4 drinking glasses. The 4 glasses required for this project are:
Juice Glass
intended for juices
can hold 6 fluid ounces
Water Glass
intended for water
can hold 12 fluid ounces
Pint Glass
intended for beer
can hold 1 pint
Wine Glass
intended for a variety of wines
can hold 5 fluid ounces
Use freehand sketching to develop the initial concept and form of your design. Sketch on 8.5” x 11” sheets of paper. Scan or take legible photographs of the sketch(es) that guided your modeling. Use Photoshop to clean up this image if necessary.
Rhino File
Your Rhino file must satisfy the following criteria:
- Each glass must be modeled solely with a single revolve
- Each glass must be a solid
- Place each glass on its own layer and name the layer accordingly
- Place each revolve curve on a sub-layer for each glass and name the layer accordingly
- Any construction geometry worth saving should be placed on a layer(s) with clear, logical naming and organizational strategy
- Align the revolve axis of each glass with the origin’s (0,0,0 point) Z-axis, with the base of the glasses resting on the Top CPlane
Put this file in your personal folder on the Google Drive. Name this file Lastname_Glasses.3dm
Rendering
Include 2 Renderings of your glasses:
- Front orthographic view showing all glasses
- Perspective view showing all glasses
Your renderings must satisfy the following criteria:
- horizontally align the glasses so they form a neat row, arranged in the following order (from left to right): wine glass, pint glass, water glass, juice glass
- leave equal spacing between each glass
- save your renderings in JPG format, with a maximum width of 800 pixels
5. Screenshot
Include a screenshot of your revolve curves with the control points turned on. Your screenshot must satisfy the following criteria:
- compose this screenshot in an orthographic view
- explode any joined curves
- horizontally align the revolve curves so they form a neat row, arranged in the following order (from left to right): wine glass, pint glass, water glass, juice glass
- leave equal spacing between each revolve curve
- save your screenshot in JPG format, with a maximum width of 800 pixels
Upload your sketches, Rhino file, and Rendering and screenshot to the shared Google Drive.
-
Classroom
-
