- Â
å Tuesday, September 19th, 2017
B “History” functionality in Rhino
We didn’t look at this in class, but the “History” functionality in Rhino could be very useful as you are work on building the bentwood chair. This functionality will link input and output geometry. In other words, it can connect a curve (input geometry) with a pipe (output geometry) so that if the input curve is manipulated, the resulting output surface will follow this change.
More information here:
http://docs.mcneel.com/rhino/5/help/en-us/commands/history.htm
B Chair Cane and Wood Texture
Here are two images that can be used to simulate a caned surface.

![]()
A basic review of how to do this in Keyshot:
- Assign the objects you want to have this texture with a “Matte Paint” material with any color (other materials will work as well, but this is a good start)
- Find this material in the list of in-use materials from the materials inspector, double click on it
- Click on the “Textures” Tab
- Assign the black and tan image to the “Color” texture option
- Assign the black and white image to the “Opacity” texture option
- Make sure the option for “sync” is turned on from the bottom of the textures properties
- Adjust the scale as needed with the slider or by entering a number in the field associated with the scale slider
And here is a wood texture you can use (it’s bigger when you download it).
![]()
í Week 2 Assignment: Advanced
Part 1: Revise and refine the design, model, and rendering of your cream and sugar set.
Part2: Working from the Watering Can Project Brief, begin exploring design concepts for your watering can with freehand sketching. This initial exploration should result in three distinct design concepts, represented in clear, descriptive, and communicative concept sketches. Work in a manner that demonstrates a commitment to creating sketches that can engage with a broad audience.
The design of the watering can should address the unique functional and aesthetic concerns of this object. Some considerations:
- Ergonomics: How does your design impact the usability of the object and the comfort of the user?
- Purpose: What kinds of plants could your watering can be used on? How does this impact the utilitarian and aesthetic aspects of your design?
- Context: What situations will this watering can be used in? How does it’s environment affect the design decisions you will make?
- Technology: How do the capabilities of your materials and production processes impact your design?
At the start, designs should be developed with traditional sketching methods, by hand, on paper. This is essential to articulate concepts and to facilitate discussion and technical support in building the model in Rhino. These sketches are required and should show an investment in time and effort. The three designs should also be developed into a “wire-frame” model in Rhino that describes the form, scale, and proportions of the object through a series of three-dimensional curves. Some basic surfacing is also permissible, but the idea is to focus on the scale and proportions, implying form and surface with curves.
í Week 2 Assignment: Beginner
Part 1: Revise and refine your work from the glasses project as necessary
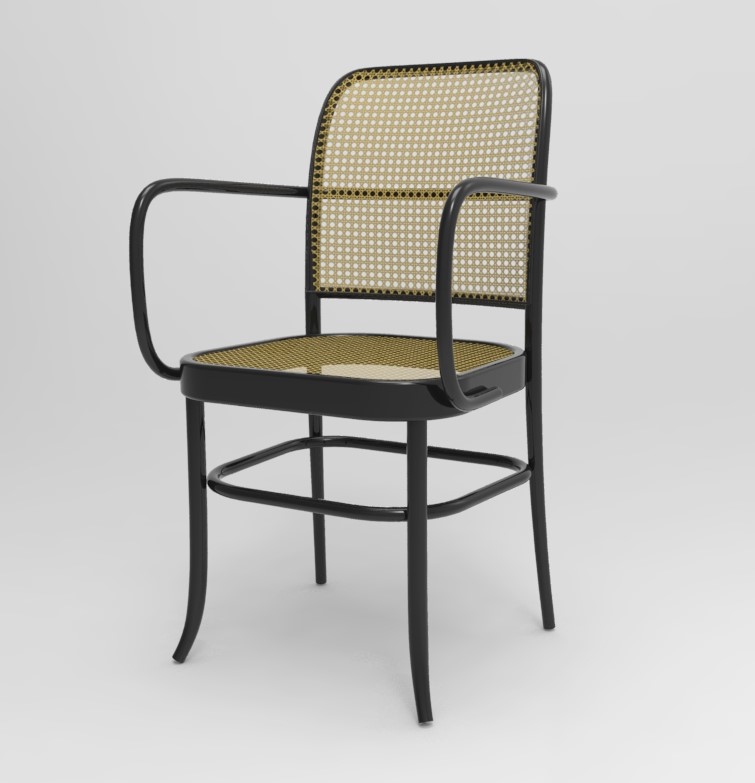
Part 2: Working from the brief for the Chair Study project, create the following:
Rhino File
- Build a model of the chair.
- Begin by drawing 3D curves that faithfully capture the proportions and scale of the chairs.
- Most of the bentwood components should be built with the pipe tool, with the majority of remaining surfaces built as extrusions or surfaces from planar curves (“planarsrf” command).
- Use nesting layers to place each part of the chair on a separate layer
- Build your model with a considered, deliberate relationship with the origin
- Keep all important curves on layers to facilitate organization and management
Rendering
- Using Keyshot, create a single rendering of the chair composed and arranged into a photographic scene in order to create an interesting image.
- Save your rendering in JPG format.
Create a folder in the shared Google Drive’s Chair Study folder with your name and place your rendering in this folder
Y Request for Requests
If anyone has something that you would like to see me try to build, send along a description and some photos or other visual references. I can demonstrate different strategies and techniques for how to model it.
( Grasshopper for next week
Next week we will start with a very basic introduction to grasshopper. Grasshopper is a plug-in that works alongside Rhino 5 and is available for free.
Windows users can download the plug-in here and follow the installation instructions.
http://www.grasshopper3d.com/page/download-1
Mac users need to work with the Rhino 6 WIP, which is a pre-release version of Rhino that is available to owners of Rhino 5 for mac. Grasshopper will run natively in Rhino 6, so for now Mac users must download and install this pre-release version of Rhino, which is still in development and thus is missing some features and may have stability issues. See more here:
http://www.grasshopper3d.com/notes/index/show?noteKey=Will_Grasshopper_work_on_the_Mac%3F
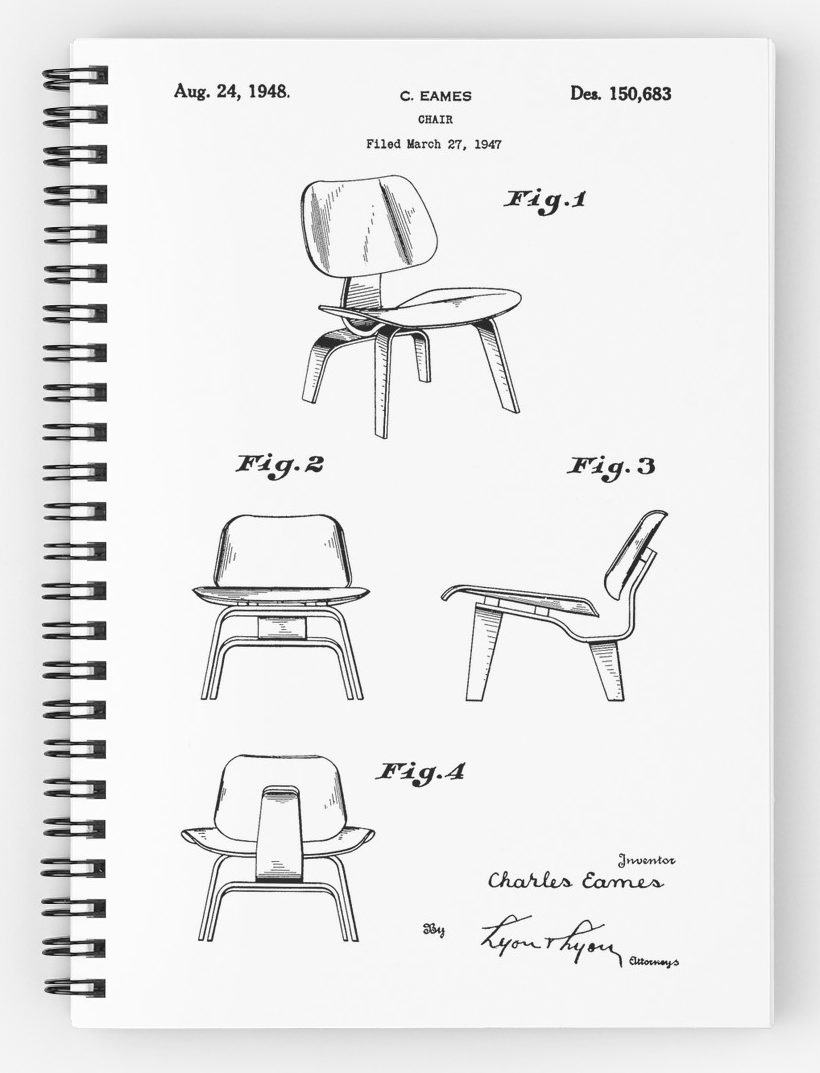
í Week 2 Challenge: Advanced
Build a model of the Eames LCW, as shown in the photos below.

í Week 2 Challenge: Beginner
Part 1: Tracing
Use the image below to trace the figures shown in red. Each figure indicates the drawing tool you should use and two of them have specific instructions about the number of points your drawing should have.

Part 2: Drawing in 3D
Fit a control point curve in the tubes included in this model. Use the exact number of points indicated by the layer name.

Part 3: Lego Figure
Using this Rhino File, assemble the Lego figure in the poses indicated this document.
Keep the original model, and make a new layer (or set of layers) for each pose.

-
Classroom
-
