- Â
å Saturday, September 16th, 2017

( Watch Videos Faster (or slower)
Some of the the videos I will post are sped up to compensate for how slowly I typically speak, but not all of them are. If you find a video is too fast or slow, you can get a browser extension that will let you speed up or slow down the videos as you like.
Chrome:
Playback speed for embedded vimeo
Playback Rate
FireFox:
Faster Video
I’m sure there are similar options for Safari and other browsers, but I can’t seem to find a free one.
( Use the Middle Mouse Button for Increased Productivity!!!!!
In both the Windows and Mac versions of Rhino you can customize the pop-up menu that appears when you click on the middle mouse button. You’ll see me do this often when I’m working in Rhino – it’s a huge productivity booster.
To customize in Windows:
Click the middle mouse button
click on the small gray bar at the top of the menu – this will “dock” the menu
remove items from the menu by holding shift as you drag them off the menu and into the workspace
add items by holding CTRL as you drag from an existing toolbar into the menu
To customize on the Mac:
http://discourse.mcneel.com/t/cant-customize-middle-mouse-button-popup-toolbar/4044
( Apple Magic Mouse + Rhino
If you have the Apple Magic Mouse and are using it with Rhino, you might find there are some things about it that are not ideal. There are a couple of tricks that might improve the behavior the mouse that you can try setting up.
If the virtual “scroll” is too fast, go to Rhino > Preferences > View > Zoom, and change to Scale factor value to a value closer to 1 to slow down the zooming speed.
You can also try the third party mouse control application called Magic Prefs that allows you to make more detailed adjustments to the mouse settings than the System Preferences panel allows.
( Where to get Rhino and Keyshot
Rhino is available from the RISD store. It’s in one of the locked cases in the back, so you will need to ask for it. But be sure to get the right OS. With a student ID, it should be $80. Regular student licenses are more expensive ($195), so don’t get it anywhere else but from the RISD store.
Here’s a link to where you can purchase the educational license of Keyshot:
https://buy.keyshot.com/products/keyshot-hd-animation-education-version
You will need to supply proof of educational status, and they approve the purchase during business hours (M-F, 9am -6pm PST) so you’ll need to keep that in mind.
You can get a plugin for Rhino that lets you work between Keyshot and Rhino a little bit more easily. Get it here:
https://www.keyshot.com/downloads/plugins/
In the meantime, you can use the trial version:
https://www.keyshot.com/try/
B Navigating the view of your workspace
By now I am hopeful that you all understand the basics of navigating the view of your model with the various functions we discussed in class.
Zoom (remember, zooming focuses on the cursor position)
- CTRL (windows) or Command (mac) + hold right click and drag forward (in) and backward (out)
- scroll wheel up and down
- pinch on trackpad (mac). You should use a mouse though.
Pan
- shift + hold right click and drag
- two finger drag on trackpad. Again, use a mouse.
Rotate (aka tumble, orbit)
- hold right click and drag
- two finger hold click and drag on trackpad. But of course, you will be using a mouse
Sometimes when you are viewing your model, you can get lost. This can happen if you zoom in or out to far or your rotate away from your object. When this happens, you can Zoom the “Extents” of your workspace. This means that the “camera” will reposition to display all of the objects contained in your workspace. To do this you can:
- click on the “ZoomExtents” button from the toolbar (looks like a magnifying glass surrounded by four triangles
- from the drop down menu select View>Zoom>Zoom Extents
- Type the command Zoom”, then pick the option “Extents”
Another thing that sometimes happen is you either can’t zoom in, or out any further than you are, or when you rotate the view, your object doesn’t stay centered in the viewport. This happens when the “focus” of the “camera” is not where you want it to be. A useful command to remedy this is Zoom Target. This allows you to select a point to recenter the focus of the camera. To do this you can:
- click on the “Zoom Target” button from the toolbar (it is the right click function of the “Zoom” button, which looks like a magnifying glass that is partially over a square drawn with dotted lines
- from the drop down menu select View>Zoom>Zoom Target
- type the command “Zoom”, then pick the option “Target”
Once the command is running you will be prompted to select a new target. Click where you want your target to be placed, then you can draw a rectangle to establish the extents of the view.
Y More about Rhino Licensing
If you are wondering: “Can I keep my Rhino license and move it to a new computer when I get one? Or will I have to buy a completely new license?”
This is a great question. You own the Rhino license and it does not expire and is not tied to a single installation or machine. The terms of licensing agreement are the same for Windows or Mac in this regard. So, the answer to this question is:
If you get a new computer, you will certainly be able to install Rhino on it. You will not need to buy a new license when you switch. Furthermore, you will be able to keep the license on your old computer, or if you get a second computer, you can install it on the two computers you own.
Remember that the license is per OS though. You need a separate license for Mac and Windows.
Here is the official language from Rhino:
The license agreement allows you to install your Rhino on all of the computers you directly control, provided you can show your Rhino will only be running on one computer at a time. Rhino is licensed on a “simultaneous use” basis and not on a “per installation” basis.
Here is the detail from the EULA:
“Robert McNeel & Associates grants you the non-exclusive license to use the Software on any computers owned by you so long as the number of simultaneous users does not exceed the number of licenses you own.”
-
You can not “loan” your Rhino to a friend or family member.
- Educational Licenses are not transferrable / saleable
Rhino is a really excellent, very valuable piece of software and students will be expected to comply with the licensing agreement of the software and to run legitimate, legally licensed copies of the software. Please understand how much value software provides and the significant discount you have available to you. If you are having a hard time with this, think about how much value you get from software and how much it costs compared to other tools, materials, and supplies you use in your work.
( Making Mac Rhino Look More Like Windows Rhino
Many of the videos we post are recorded on a Windows computer. Some of you might prefer your setup to look more like the Windows version of Rhino. Here’s how Rhino approaches this:
“By default, Rhino for Mac presumes you are not coming from Rhino for Windows. If you would like to see Windows-esque toolbars, navigate to Rhinoceros > Preferences > Themes and select Rhino for Windows. You will need to start a new modeling window for these changes to take effect.”
See more about the interface differences between Mac and Windows here:
B A review of Rhino’s interface and Geometry Types
If you need a refresher, here is a review of the Rhino interface.
And here is a review of the various kinds of geometry you can work with in Rhino.
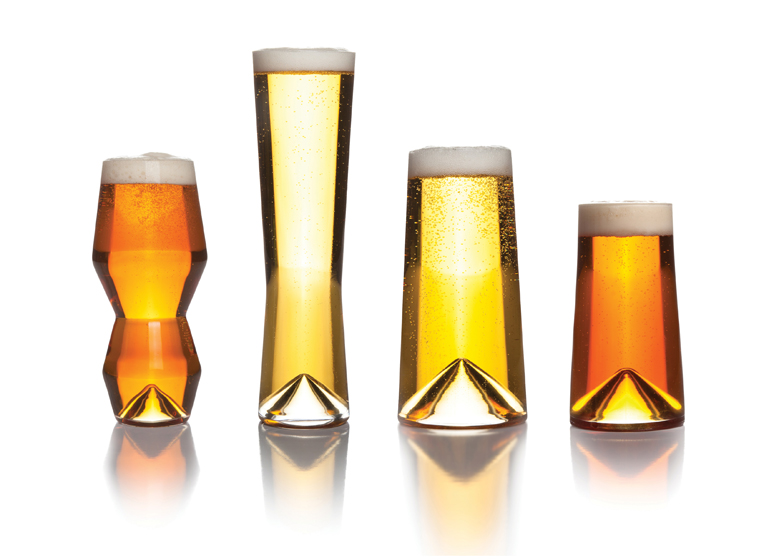
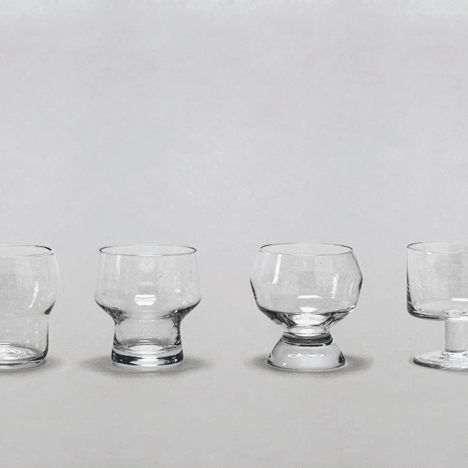
B How to make a screenshot
The drinking glass assignment requires that you take a screen shot of your revolve curves. Here’s how to do this:
Windows and mac:
Make sure the viewport you want to capture is active, then run the command – ViewCaptureToFile.
Also FYI:
the Mac OS has an easy to use screen capture tool built in. Press Shift+Command+4 and a cursor will appear that allows you drag an area to capture as a screen shot. You should hear a shutter sound, this means that the image is saved to your desktop.
Windows has a built in app called “Snipping Tool” that can be used for screen shots.
B More information on the “PictureFrame” command
If you’ve seen Part 1 of the Drinking Glasses Demo videos, then you’ve gotten a taste of what the PictureFrame command can do. This is a great tool and I use it all of the time if I need to bring in an image to use as an underlay for tracing, modeling, reverse engineering, etc, etc. Here is a more in-depth look at how it works.
B Drinking Glass Demo Part 3: Rendering with Keyshot
Part 3: This Video demonstrates how to do a basic rendering with Keyshot, including how to set up the kinds of materials you may want to use for this project.
B Drinking Glass Demo Part 2: Volume Analysis
Part 2: How to measure the volume of your glass.
Commands used in this video:
- box
- booleansplit
- volume
B Drinking Glass Demo Part 1: Drawing and Revolving
Part 1: A review of the drawing and modeling techniques required to complete the drinking glass assignment.
Commands used in this video:
- Pictureframe
- Curve (control point curve)
- fillet
- BlendCRV
- Scale1D
- join
- explode
- revolve (full circle)
B How to use the trim, split, join, explode, and cap commands
An introduction to several useful editing commands in Rhino.
The commands covered in this video are:
Trim
Split
Join
Explode
Cap
Fillet (with radius set to a value of 0)
-
Classroom
-

Leave a Reply
You must be logged in to post a comment.